Growing your own mushrooms at home can be a transformative experience, and if you're looking to…
Mushroom Contamination Guide: Identify, Prevent and Treat Top 3 Types
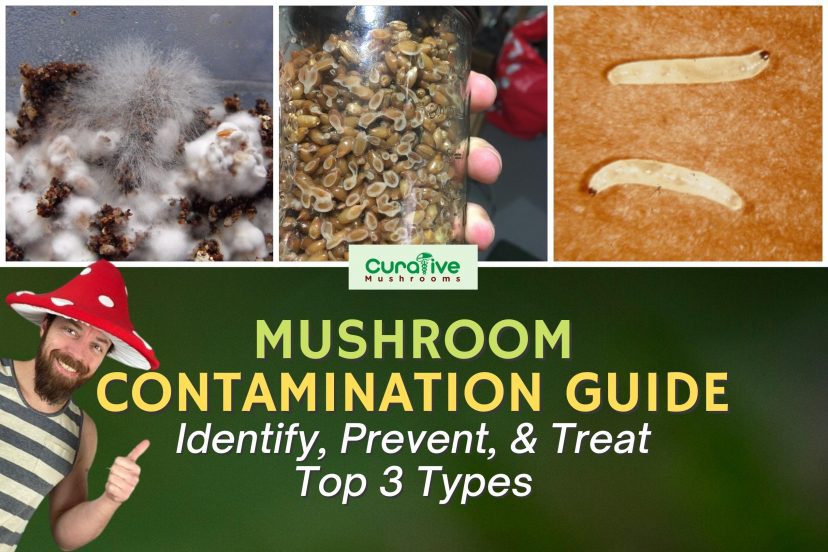
Identifying and treating mushroom contamination is one of the biggest challenges you will face when growing mushrooms at home. That is why this guide is here to help you.
To start, mushroom contamination that occurs from inoculation to the fruiting phase mostly comes from the substrate itself.
Simply speaking, a contaminated substrate occurs when the pasteurization and sterilization process fails.

Some contaminations are visible in your substrate. Thus, you may choose not to waste your mushroom spores or spawn by inoculating them onto the grow bag.
However, though the substrate looks okay and you decide to inoculate it, unnoticeable and unwanted contaminants may lurk…
Then, you’ll just be surprised that they will defeat your crop after inoculation.
Luckily, mushroom growing for hobbyists is simpler these days. There is already a wide range of contamination-resistant and ready-to-inoculate grow bags in the market.

Thankfully, that is one less thing to worry about if you’re just about to start with your grow kit. But mostly, you’re here because you already have contamination in your mushrooms or mushroom block. Right?
To assure you, even the most experienced mushroom growers still have a 5% contamination rate. That means that five out of 100 grow bags they use to grow mushrooms will have contamination.
You don’t need to worry, though. This article will show you how to identify, prevent, and even treat the most common types of mushroom contamination. Yes, you read that right—you can still save your crop! 😉

Identifying, Preventing, and Treating Mushroom Contamination
Below, we will show you the three most common types of mushroom contaminations:
Mushroom Contamination #1: Mold
 One common type of mold that loves competing with your mushrooms is Cobweb Mold (Hypomyces rosellus, formerly Dactylium dendroides).
Cobweb Mold is a surface mold that thrives in environments with still air, very little oxygen, and high humidity.

The ideal growing condition for mushrooms invites different types of molds like:
- Green mould (Trichoderma spp, most commonly Trichoderma harzianum)
- Black mold (Stachybotrys)
- Orange-red bread mold (Neurospora)
- Black bread mold, a.k.a pin head mold (Rhizopus)
1.1 How to Identify Mold
Most molds start as stringy white growth. They can be tricky to identify because of their similarity in appearance to the mushroom mycelium.
But you can tell them apart by observing the color and speed of growth. Take note that mushroom mycelium is bright white. In a few days, mycelium appears much brighter.

In contrast, molds appear dull and will develop into a different color in 24 hours. It grows fast!
So if a puffy growth in your kit appears out of nowhere, that’s more likely mold.
1.2 How to Prevent Mold
One of the main reasons cobweb mold hits a substrate is poor air exchange. So the best way to prevent cobweb mold is to improve Fresh Air Exchange (FAE) or airflow.
FAE refers to the amount of fresh air moving around the grow kit. You may fan your mushroom monotub or fruiting chamber six or ten times a day to encourage FAE.
But if your substrate is not yet ready to be transferred to the monotub, you may make a small incision through the plastic. This will expose a layer of the substrate.
However, if you are still not in the fruiting phase, making an incision through the plastic might expose your grow bag to more contaminants.
1.3 How to Treat Mold
Hydrogen Peroxide ( H2O2). To get rid of mold, mushroom growers advise spraying the surface mold with 3% hydrogen peroxide.
Simply, it’s 97% distilled water and 3% hydrogen peroxide. A 100mL bottle will contain 97mL water and 3mL peroxide.
You do not need to create your own solution since you can just buy over-the-counter. Hydrogen peroxide is sold in concentrations of 3 to 12 percent at most drug stores and online stores.
How would you apply the solution? Apply the solution by using a clean spray bottle. Simply spray the whole surface area of your infected substrate or fruiting block with the solution.
From there, watch with satisfaction how those naughty molds dissolve right before your eyes! Just like dissolving a gray cotton candy. 😉
Mushroom Contamination #2: Bacteria

It is not just other species of fungi that will try to intrude on your substrate. Uninvited bacteria may also be a great gate-crasher.
The most common type of bacteria contamination is the Bacillus subtilis. It is commonly known as Wet Spot, Soft Rot, or Sour Rot. It is a Gram-positive, rod-shaped bacteria that forms heat-resistant spores.
Fun fact: This species can also be found on our feet. They eat leucine, an amino acid common in the sweat on our feet. Ew!
2.1 How to Identify Sour Rot (Bacillus subtilis)

The presence of this bacteria is often made evident by the production of slime. Also, almost all other bacteria that may invade your mushroom culture will produce slime.
Slimy foul-smelling patches on your substrate and mycelium indicate excess moisture. Most of the time, these slimy patches are bacterial contamination.
Yellow liquid secreted by the mycelium—is it bacterial contamination? Not always. The liquid secretion in your colonized block may be normal.
Besides, the white mycelium secretes enzymes into the food source (substrate) to break it down. It can be likened to how your stomach lining makes acid and enzymes that break down food.
Once nutrients in the substrate are broken down, they are absorbed by the mycelium through facilitated diffusion and active transport.

Also, the mycelium secretes waste products called secondary metabolites or mushroom exudates. This is the mycelium’s way to fight off pathogenic microorganisms. Most of the time, the mycelium will win.
Bacterial contamination and normal mycelium enzyme secretion—how do you tell them apart? If your kit is infected with bacteria, specifically with the Bacillus genus, it will emit a significant sour foul stench.
If the slime occurs right on your mushroom, is it contaminated? 99%, it is contamination. The mycelium secretes enzymes to break down food, not the fruiting body (mushroom) itself.

Is mushroom bruising a sign of bacterial contamination? No. Bruising, especially on magic mushrooms, is normal.
What you can do is conduct a simple q-tip test. Using a q-tip, just gently swab the part of the mushroom where discoloration is evident. If the color does not come off, your mushroom is not contaminated.
2.2 How to Prevent Sour Rot (Bacillus subtilis)
To prevent sour rot, make sure to remove all the infected grains before inoculation.
Also, follow the correct sterilization process before you inoculate your grow bag. Do not touch the syringe’s needle with your bare feet… I mean ‘hands.’
2.3 How to Treat Sour Rot (Bacillus subtilis)
If bacterial contamination occurs on the grain of the substrate (where they often feed on), you may just scoop out those grains.
But first, make sure that you use a sterile spoon. You wouldn’t want other common contaminants to come in contact with your substrate.
You may use 70% isopropyl alcohol or the flame-sterilization method to sterilize the spoon. Either way should kill lurking contaminants in your spoon.
Mushroom Contamination #3: Pests

Sciarid flies (fungus gnat in the family Sciaridae) are the most common mushroom grow kit pests that damage the crop from spawning to harvesting the crop.
They infest grain spawn, mycelia, pins, mushroom stems, and caps.
The female sciarid flies usually deposit eggs in the substrate’s surface layer, which will hatch within a few days under warm conditions.
3.1 How to Identify Sciarid Flies Infestation

Sciarid flies are small grayish-black insects measuring ~1/4 inch long. They have long antennae, gray wings with a clear split vein, and relatively long legs.
At 75ºF, sciarid eggs hatch in about three days. In their larvae stage, they can grow to 5 to 12 mm in length and 0.5 to 1.5 mm in diameter. The body is yellowish-white with a black head.
Mostly, you will see the larvae jumping or hovering over the substrate surface. From that stage, it takes approximately ten days to develop into pupae. Then, for about four days later, it emerges into an adult fly.
3.2 How to Prevent Sciarid Flies Infestation
To prevent sciarid flies and other nematodes from infesting your grow bag, don’t give them a point of entry to lay eggs. Thus, check for holes in the bag and cover with clean tape if there are any.
Do not leave the window of your room open because it can invite flies. Flies will land and lay their eggs on compost and substrate closest to the entry point.
The threat of infestation is greatest during March to July and September through late November. During this season, outdoor temperatures are between 50°F and 75°F.
Further, at normal room temperatures (65 F to 75 F), the life cycle of sciarid flies (egg to adult) may be completed in three to four weeks.
3.3 How to Treat Sciarid-Infested Mushroom Kit
There are two main insecticides that growers use to help control the flies. Those are insect growth regulators (IGR) and adulticides.

Primarily, IGrs are insecticides that mimic hormones in young insects. They disrupt how insects grow and reproduce.
On the other hand, adulticides such as aerosols, foggers, or sprays can quickly but temporarily reduce the number of adult gnats.
Application steps may differ based on which products you get.
Additionally, you may also try using the old-fashioned sticky flypaper. You may simply place or hang it near your window or wherever there will be a place of entry in your room.
Conclusion
To summarize, the three most common types are cobweb mold, bacteria such as B. subtilis, and pests such as sciarid flies.
Now, you should have a good idea of identifying contamination, preventing it, and treating it.
Most of these contaminations occur when the substrate preparation and inoculation fail. That is why you should get your Grow Kit from a trusted supplier.
If you have a supplier who guarantees contamination-free grow bags and viable spore syringes, you will lower your chances of having to fight off these mushroom contaminants.

Sometimes, growing from grow bags and the contamination gets out of control. Therefore, it might be less stressful and cheaper to toss your contaminated bag in such a case.
Once a sign of contamination shows in a grow bag, immediately separate them from the healthy ones.
You may start again with a new set of grow bags and spore syringes. Your trusted supplier may also offer free replacement bags and spore syringes.
Lastly, here’s something vital you should learn here: You need to have a sterile environment during the inoculation process and be careful in handling your crop.*
Happy Mushroom Growing! 🙂
Check out our other article: Sterilization For Mushroom Cultivation | Cheapest & Most Effective






Hi Oliver. You have some GREAT info here on mold, bacteria and pests! I’m giving a talk at the Cannabis Science Conference this month in the psychedelic science track and I would like to know if I can include some of your info in my talk. I can credit Curative Mushrooms and provide a link to your website if you are amenable.
Hi, Scott. Jessie here from the Curative Mushrooms team. Sure, Oliver would appreciate that! We wish you all the best for your conference talk. 🙂
[…] is mold or normal blue bruising? Read this article to learn how to tell them apart. Or see how the q-tip test […]
HI, I am a relatively new grower and I just unwrapped my shiitake fruiting blocks that have been sitting in a fridge for a few days and they smell sweet and sour. Other than that they look fine and have no noticeable mold or secretions and are damp to the touch(with gloves). Is this bacterial and If I try to fruit them will they contaminate everything else?